Beading technique: Looped fringe with sequins

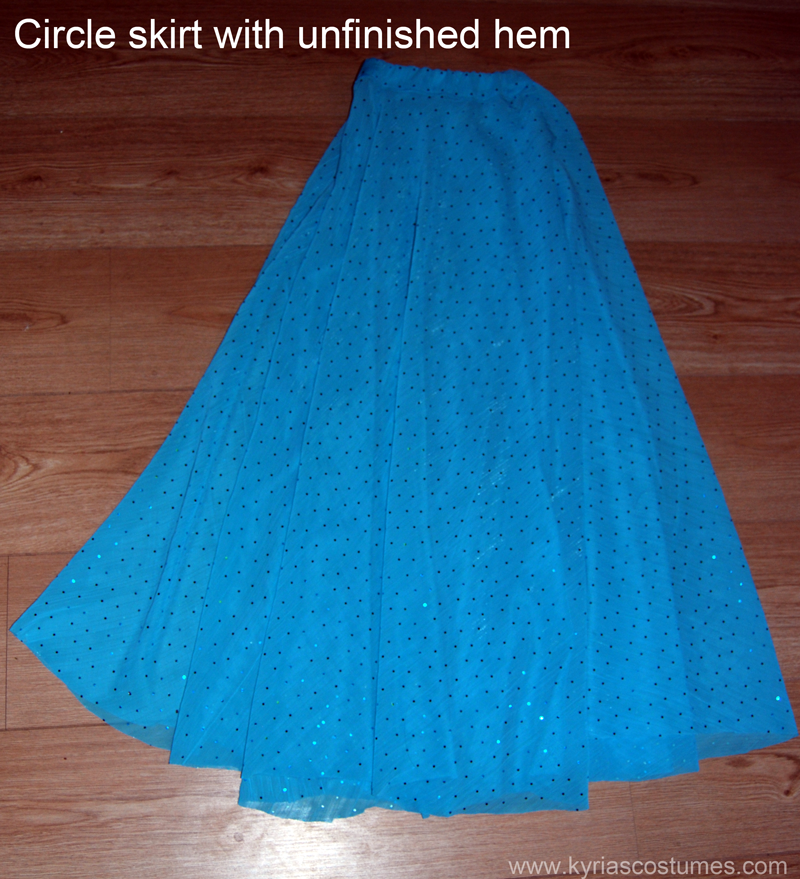
Summer is great for all the projects that are lying around and need to be done. Often these projects don’t need much time or effort but somehow they just don’t happen. I decided to tackle my pile of unfinished projects one by one and my first project was a red beledi dress that I bought five years ago. It’s a troupe costume and each troupe member converted the sleeves to a different style.


2013 DD beledi groningen
The Dalla Dream Dancers backstage in our beledi dresses


I wore it as is, without finishing the edges of the sleeves or beading the sleeves. As a result, I always felt a bit uneasy when wearing the dress. Pulling it out of the pile I gathered my materials and got to work. It took me about three hours to finish the edges and now I can put it back in the closet, knowing that it will be ready for the next performance.

While working on the edge, I took some pictures so I could share this technique with you. It is a looped fringe with a big sequin in the middle, that adds sparkle to the edge, weight to the sleeve so it drapes better and a bit of extra movement.

Supplies

Seed beads

Cupped sequins (I recommend higher quality laser holographic sequins because they last a long time.)

Paillettes (I used holographic pailettes app 20 mm in diameter)

Thread (For durability, use extra strong thread)

Needle (as small as possible, to get through the seed beads)

Technique

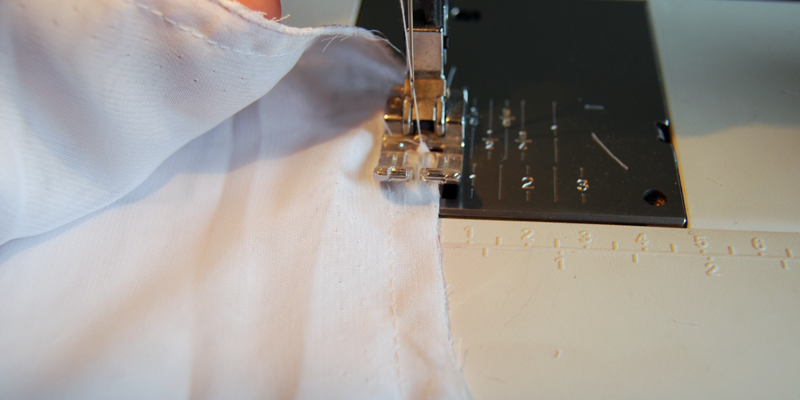
Start by threading your needle and anchoring the thread to the fabric. Or, in different words: thread your needle and tie a knot in the thread. Choose your starting point and get your needle through the fabric from the back to the front, then to the back of the fabric again. Secure the end. Stick your needleback to the front and let’s get started on the beading!img_7293Add to your thread: one cupped sequin (make sure the cup sits with the bottom towards the fabric), fifteen seed beads, one pailette and then fifteen seed beads again. It looks like this:

img_7295Pick a point app 1″/2,5cm to the right of your starting point, and stick the needle through from the bottom of the fabric to the top. Tug lightly on the thread to tighten the beads and sequins.

img_7296I like to knot my beading as often as possible, so I make a knot at this point to secure the loop into place. If the beading breaks, I will only loose one loop of fringe, not a whole row.

Rinse, repeat.

Once the whole edge is finished, the effect is a shiny, beaded edge with a lovely dangling paillette in the center of each fringe. This technique is very forgiving so it looks rather uniform even when the distance between the starting point and the end point is more or less than 1″/2,5 cm.

I am a professional bellydancer, costume-a-holic and dance studio owner living in the Netherlands. My biggest passion is teaching and performing bellydance and I intent to continue doing so for quite some time! I am a teacher at the online Belly Dance Business Academy, where you can find courses and workshops to help you grow your belly dance business. If you like to be kept in the loop, please like Kyria Bellydance on Facebook or follow me on Twitter. Leave your questions or comments in the box below, or let me know through Facebook.


Beading at 112 kmph

When people see me working on costumes the most heard comment is: ‘Doesn’t it take forever to finish a costume?’. My common answer is: ‘It does take quite some time’.  I always wonder what the rationale is behind this question. Should I not start a project that requires a great deal of my time? Are they amazed that I am not getting bored by sewing thousands and thousands of sequins and beads to a costume? Or do they wonder how I have time to make costumes?

My secret to costume making is my daily commute. For my day job I travel roughly sixty five km by train. Living on the outskirts of a city means taking the local train, and the local train uses app. 50 minutes to get to my destination. That’s fifty minutes of sleep, listening to music, staring out of the window, checking facebook updates on my phone….  or fifty minutes of costuming. This is my regular view: the screen on the top tells me we are travelling at 112 kmph. The seats are color coordinated with the project I am currently working on.

IMG_5093At the end of the day when I am done with work, I have to take the same train back home. That’s another fifty minutes of costuming. The tricky bit is preparing workthat can be done in the train. For example, bringing a lot of supplies with me is out of the question. Bringing something with me that needs a lot of workspace is also a big no no. The tables are narrow and small and often I can’t get a seat at the window during rush hour.

I learned to pack light, bring only the bare essentials for what I’m working on and to divide my work into chunks. For example, I am working on filling triangles with a random bead pattern. This is what I can get done in fifty minutes. For the record, this was the biggest triangle.IMG_4959

I am not putting pressure on myself to finish something in the limited time that I have. Instead, I focus on motivating myself to get started. If I don’t feel like beading, I simply don’t. But I know how happy I am when I finish a costume and get to wear it. Working on a costume is essential to getting closer of the shiny prize at the end of the proverbial tunnel. And there’s another pay off! Beading works like meditation for me. It’s totally zen to not stare at a screen, to limit my vision to the fabric before me and not do anything else. Sewing can be kind of therapeutic for the very same reasons. When others see a box of beads and a seemingly endless project, they get stressed out. When I see a box of beads, I think of how lovely it will be when it is done.

IMG_5023

Another option is beading while watching the TV, something I used to do when I had more time on my hands. Something that requires little attention to follow the plotline is perfect. Nowadays I don’t watch much TV as it is. Too busy being home and running around after the little one, cooking dinner or being too tired to pick up a needle.

What are your time saving tricks to get some sewing or costuming done?

I am a professional bellydancer and costume-a-holic living in the Netherlands. My biggest passion is teaching and performing bellydance and I intent to continue for quite some time! If you enjoyed this post and like to be kept in the loop, please like Kyria Bellydance on Facebook or follow me on Twitter. Leave your questions or comments in the box below, or let me know through Facebook.


Sewing bias tape to the edge of a veil

It’s recital time in my neck of the woods, otherwise known as ‘validating that I really need this many belly dance costume items by letting my students wear them’. It’s also an excellent opportunity to buy or make something new. 

This year my students got the colorscheme ‘blue and purple’. I dug up all my blue and purple items and started fixing things.

First up was a blue and purple changeant organza veil with bias tape edging. It is lovely but one pf the edges started to fray and the bias tape started to come off. An excellent opportunity to write about using bias tape to finish the edge of a veil.


Adding biastape is only useful if the veil itself is not weighed down too much by the edging. For example, a delicate silk veil woul become harder to handle with cotton or satin biastape along the edge. For organza, it really helps to get a better grip on the veil and to prevent ugly hems. Rolled hems on organza often look a bit rough. 

For edging the veil, use a zig zag stitch all around the veil to capture the fraying threads along the edge.


Take the bias tape (this is satin bias tape) and carefully fold and pin it along the edge. This might take a while. 


Sew along the edge of the bias tape, capturing the edge of the veil between the tape. Go slowly and make sure you’re sewing through both sides of the tape. Check for missed spots and fix them by sewing over the biastape again, slightly closer to the edge and this time surely capturing both sides of the tape.


There you go, one neatly edged veil, ready to go!

How to finish a straight seam

Seam with zig-zag stitch

I’ve been working on the Moon Goddess costume as my performance is due next Saturday. I finished a double layered white chiffon circle skirt that is part of the Goddess costume. It is now hanging upstairs, waiting to be danced in. The belt is mostly done and is ready for fringe and more rhinestones. I’ll post a costume project update later this week.

While making the skirt, I took a couple of close-ups to show you how to finish a straight seam with a regular sewing machine.

What does an unfinished seam look like?

Unfinished seams in a finished costume are a sign of poor workmanship. The purpose of finishing a seam is

  1. to reinforce the seam: if the seam rips, at least the finish will help to keep things together;
  2. to prevent the fraying, which will lead to damage to your seam in the future;
  3. to prevent burlign of the seam creating bulges and uneven lines;
  4. to flatten the seam and make the seam as invisible as possible;
  5. to clean up the interior of your project. It just looks better.

Finishing a seam if a proces that is almost identical for most fabrics. I use this techinque for almost all fabric types and it creates supple, neat, flat seams. Keep in mind that it works best for straight seams!

Seam with selfedge
Seam with frayed edge on the top

Let’s get started

Make sure you’ve stitched all the neccesary pattern pieces together and you’re ready for finishing your seams. Most patterns include a seam allowance of 2 cm. 4/5″. This leaves quite a wide seam on the inside of your garment that needs to be taken care of.  The first step is taking a pair of fabric sciccors and trim the seam allowance back to about 0.5 cm – 1 cm/ 1/5″-2/5″.

Trim seam allowance
Trim seam allowance

Get your sewing machine out and choose a wide zig-zag stitch. My machine is automatically set to a seam length of 2 mm and a width of 3 mm. Feel free to experiment a bit with what suits you best: for example, a 5-6 mm wide sig zag also gives a nice finish. Stitch over trimmed edges of the seam, catching both layers with the same stitch.

Seam with zig-zag stitch

The end result is a narrow seam with a neat finished. Sometimes small threads of the fabric escape from the seam: use scissors to trim it down.

Finished seam
Finished seam

I am  a bellydancer and costume-a-holic living in the Netherlands. I enjoy blogging and I have big plans for the future with regards to writing and publishing books and such. All that, and a full time day job too! If you enjoyed this post and like to kept in the loop, please like Kyria Bellydance on Facebook or follow me on Twitter. Leave your questions or comments in the box below, or let me know through Facebook and I might write a blog post to answer your costuming question.

Thanks for reading and see you soon!

Different ways to hem a circle skirt

Different circle skirt hemming techniques

In my last post I mentioned a quick way to cut the hemline of circle skirts when you’re in a hurry. After cutting, the hem still needs to be finished! This blogpost is about the different ways to finish the hemline of a circle skirt.

Determine the best technique for hemming: the shape of your hemline and the fabric of your skirt

Before I start on the techniques, let’s have a quick look at the shape of the hemline and the material of the skirt. These two factors are important for deciding which type of hemming works best for your project. A circle skirt is made out of panels cut in a circle shape, creating a rounded hemline. This is important as rounded hemlines can’t easily be folded over. Try it with a circular piece of paper: if you fold the edge inwards, several folds along the edge are needed to fold the paper inward all along the edge. The same thing happens with fabric:  the ‘ fold over and stitch-technique’ will create a messy hemline.

The second factor is the fabric. I used a chiffon like fabric: a semi transparant woven fabric. There is a slight stretch to it (normal synthetic chiffon doesn’t stretch), making it easier to use techniques that require a bit of stretching and fiddling with the fabric while hemming.

What are these ‘techniques’ I keep talking about?

When I mention ‘technique’ I am talking about different ways to sew something. For instance, a hem can be finished by a fold-over-and-stitch- technique, or a rolled hem technique. In both cases, the skirt has a finished hemline. The result of each technique might be slightly different.  That’s why it’s important to learn about different techniques. Remember my adagio costuming is about what works for you? Sometimes a rolled hem might work, sometimes a serger might be the answer to all your problems. Fold over hems are prefect for straight hemlines and give a great result, but are unsuitable for curved hemlines. Being able to use different techniques and being able to judge what technique will give the desired effect is the sign of a good seamstress.

My favorite techniques for neatly hemmed circle skirts are:

  1. The basic rolled hem
  2. The serged hem (only works if you own a serger or are close friends with someone who owns one)
  3. The rolled hem with fish line finish (adding fish line)

This is a circle skirt with unfinsihed hem, to give you an idea of how the hemming technique can change the look of the skirt.

Circle skirt with unfinished hem

The basic rolled hem

Use the fingers of your right hand to slightly roll the edge of the fabric inward, and stitch right on top of it so it stays put. The fraying edge of the fabric is neatly tucked away. The nice thing about this technique is that it is a fairly simple concept. The tricky bit is that rolling fabric by hand while operating your sewing machine can get messy and result in uneven, quite big, rolled hems.

I highly recommend investing in a sewing machine foot called the ‘rolling hem foot’. What it does is roll the fabric for you, as long as the fabric edge is fed into the foot in the right way. Sometimes it is included with your machine but if it is not, go to your local sewing machine store and order it. It will change your life for the better. With a rolleed hem foot, creating even, neat and narrow rolled hems is a walk in the park. It takes a bit of practice and after that you’ll be hemming in no time. Roll hemming creates a narrow, roll like hem.

The serged hem (you need a serger for this one)

I am slightly envious of people who own a serger. It’s an amazing machine that can stitch, finish and cut fabric at the same time. It’s the reason why store bought items always have such nice finished seams. If you own one, it will also be the bane of your existence. Operating one is not easy and since it uses 3-5 threads at the same time, a lot of things can (and will) go wrong. However, if you own a serger or are close friends with someone who owns a serger, finishing the hemline with a serger is a great option. It will create a narrow, flat, flexible hem. Special thanks to Brenda for serging this skirt for me 🙂

Circle skirt with serged hem

The rolled hem with lettuce finish (adding fish line)

If you’re into fancy finishes, try edging your circle skirt with fish line! It is a relative easy proces. Instead of a normal roll hem, sew fishing line inside the rolled hem. The fishing line comes from a spool and thus creates a meandering, lettuce like effect. Sparkly belly has a more extensive post about this technique on her website.

This technique creates a hem that is rolled, and falls in natural curles and curves.

Circle-skirt-fishline hem
Circle skirt with rolled hem and fish line

For tutorials about how to add fishing line to the hemline of a skirt, try this curly hem tutorial on Youtube, this tutorial by Sparkly Belly. It is fairly easy to add the fishing line to the rolled hem and I really like the results. So floofy!

For your enjoyment, here is a quick overview of the effect of the different hemming techniques.

Different circle skirt hemming techniques

If you enjoyed this post, please like Kyria Bellydance on Facebook or follow me on Twitter. If you have a question or comment, let me know through Facebook and I might write a blog post to answer your costuming question.

Thanks for reading and see you soon!